A Step by Step Guide: How to use layers to single out a size + printing tips
- Melanie Boivin
- Aug 10, 2023
- 3 min read
Updated: Aug 7, 2024
Wildflower Design creates pdf patterns using layers which means you can select your size and unselect the others to make viewing, printing and cutting out your size much easier. While It is possible to print without unselecting layers, but you will need to be extra careful when cutting out your size, and the pattern pieces may be more difficult to read. So that is why I reccommend using layers to print.

Start by opening the folder on your desktop that contains the pattern files by double clicking it. In this example we will be using the Coquelicot skirt files:

Note: using Adobe Acrobat as your pdf reader is the only way to use the layers option. It is a free program that you can download from adobe if you do not already have it as your pdf reader.
Do not use your internet browser to print the files, as it may cause innacurate printing and will not allow you to separate the layers.
Once opened, there will be several different files:

Print at home files- which are usually separated into 2 files, one for 00-16, and another for size range 14-32. Copyshop files - which is a large scale file to be printed at professional printing company who prints the pattern on a large sheet, so you dont have to assemble and glue pages together. Sometimes these are separated in two files per size range, depending on the pattern. These can be printed both in the US or anywhere else in the world as it is compatible for both US copyshop paper size and A0. There is also an instruction sheet for the printing company separately if you want them to print a selected size.
The Instructions in english and french - this includes instructions for sewing the pattern, size chart, fabric requirements, notions etc.
Projector file- This file has been created specifically for sewists using a projector to cut their projects. It includes the layers and an optional grid in both a metric and imperial measurement. There is a separate file for instructions on layers as well.
For printing at home and using the layers, we will open the print at home file, and we are using the 14-32 sizes file for this example:

The file will appear as the image above once opened. You will see on the left hand side the different sizes listed. If you do not see them, click on the icon that looks like a stack of papers. All of the sizes are selected, because there is an eyeball in the box beside each size, and you can see that on the document the pattern shows multiple lines, which are all the sizes showing.
Now if we unselect every size except for our size 26/28 for example, you will notice that the pattern on the doument only shows the one size. The pattern pieces have 2 lines, a bolder one which is including the seam allowance, and a fainter one, which shows the pattern piece without seam allowance. This is one size, and is much less confusing to read and cut out once all of the pages are printed and assembled together.

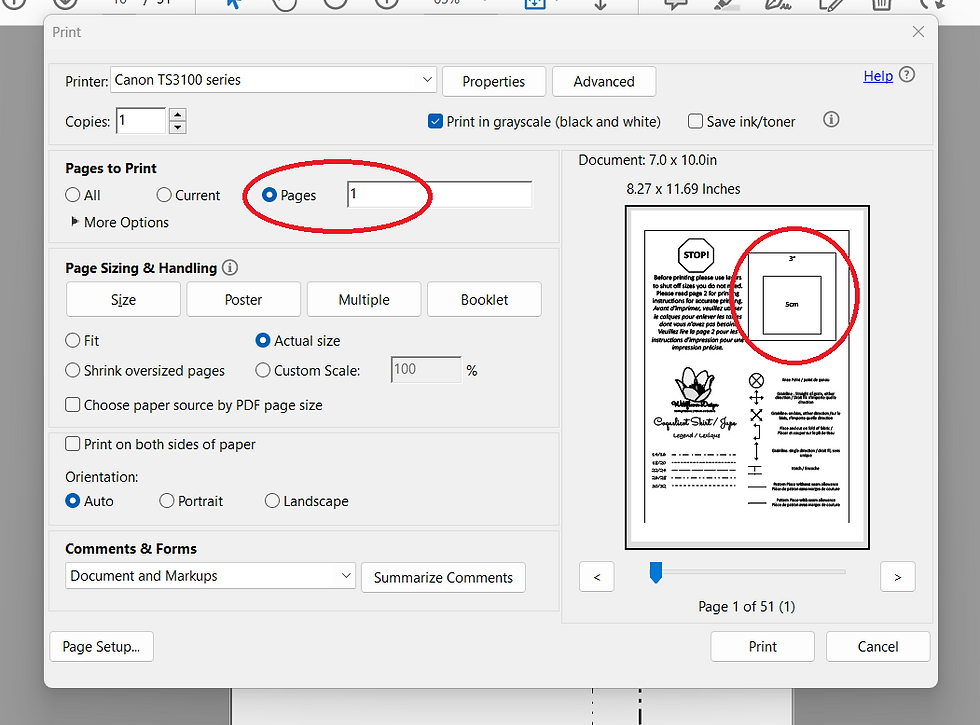
To print, you will select print at actual size or custom size 100%. This will ensure that the pattern is accurately printed at the right scale. I suggest to print the 1st page only at first to confirm the scale sqares measure as indicated. You can do this by selecting ”pages” and typing in 1, to print page 1 only.


The squares should measure as indicated, 3 inches for the larger square, and 5cm for the smaller square:

Once you confirm the scale is correct, you can go ahead and print the rest of the pages, in this case for this example will be pages 2-51.
Hopefully that helps you print successfully so you can start on your new exciting sewing project!
Stay tuned for another blog post coming soon about how to assemble your pdf pattern.
Happy sewing,
Melanie


